
Any tips/information submitted, posted, or contained in this website is for general information purposes only.
We make no representations, completeness, accuracy, reliability, suitability, or warranties of any kind.
Any reliance you place on such information contained on the website is strictly at your own risk. Further research is recommended.
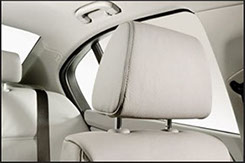
Get yourself and any passengers to safety. No special tools required! The key to your salvation in an accident
is already affixed to your seat. The headrest!
In case of an emergency, calmly and quickly remove the headrest from the back of your seat, keeping the
pegs held outward toward the window.
Now you can do one of two things:
Most people will want to whack the window to shatter the glass, which is a great technique… if it works.
However, the best method is inserting a headrest peg between your window and the seal, shoving it down as
hard as you can. Rear back, pulling the headrest toward your chest to put tension on the glass.
This stress will cause the glass to shatter and crumble, keeping you safe from bruises and cuts, as well.
Depending on where you’re stuck, water might come rushing in or you might have to dig yourself out. These cases are where a simple set of tools, such as a miniature hammer, small spade, and seat-belt cutter, could come in handy. There are actually complete emergency kits for cars that can be purchased to give you an advantage over these possible situations.
You may be asking yourself, “Why would I need to break the glass when I can open the door?”
In some car accidents, especially when dealing with water, the pressure of something outside could jam your door’s latch mechanism or bend the frame, making it nearly impossible to apply enough counter-pressure to escape. Be prepared for anything!
Are you wondering how you’re going to manage getting your headrest off? Some people have expressed their concerns that they can’t get their headrests off in the best of times, much less when they’re panicking.
Here’s what you do… practice! Remember what I mentioned about preparing? The best time to prepare for an emergency is before it happens. Designate times or days when you have nothing to do, and take some time to practice the headrest removal in case of an actual emergency. Because if anything ever does happen, you’ll be glad that you knew how to free yourself from a possibly fatal predicament.
Using Your Headrest to Break Car Windows in an Emergency
- - - - - - - - - - - - - - - - - - - - - - - - - - - - - - - - - - - - - - - - - - - - - - - - - - - - - - - - - - - - - - - - - - - - - - - - - - - - - - - - - - - - - - - - - - - - - - -
- - - - - - - - - - - - - - - - - - - - - - - - - - - - - - - - - - - - - - - - - - - - - - - - - - - - - - - - - - - - - - - - - - - - - - - - - - - - - - - - - - - - - - - - - - - - - - -
Rusty Nuts/Bolts
Removal
Machinist's Workshop Magazine recently published some information on various penetrating oils. The magazine reports they tested penetrates for break out torque on rusted nuts.They are below. They arranged a subjective test of all the popular penetrates with the control being the torque required to remove the nut from a "scientifically rusted" environment.
Penetrating oils ........... Average torque load to loosen
No Oil used ................... 516 pounds
WD-40 ..................... ... 238 pounds
PB Blaster .................... 214 pounds
Liquid Wrench ...............127 pounds
Kano Kroil .................... 106 pounds
ATF*-Acetone mix............53 pounds
The ATF-Acetone mix is a "home brew" mix of 50 - 50 automatic transmission fluid and acetone. Note this "home brew" released bolts better than any commercial product in this one particular test.
ATF-Acetone mix is best, but you can also use ATF and lacquer thinner in a 50-50 mix.
*ATF=Automatic Transmission Fluid.
- - - - - - - - - - - - - - - - - - - - - - - - - - - - - - - - - - - - - - - - - - - - - - - - - - - - - - - - - - - - - - - - - - - - - - - - - - - - - - - - - - - - - - - - - - - - - - -
Brake Fluid Info:
ClassicTube
WHICH BRAKE FLUIDS? The marketplace is inundated with different types of brake fluid. Which should you use and why? The most common brake fluid is DOT 3, which is glycol-based. The Department of Transportation (DOT) number indicates the brake-fluid boiling point. Under pressure, brake fluid gets hot. Slam on the brakes or brake hard continuously and brake fluid temperature skyrockets. DOT 3 means the brake-fluid has trouble when there's 3 percent water in the fluid. This is known as the fluid's minimum boiling point.
Theoretically, brake fluid comes out of the bottle with 0-percent moisture, which means a boiling point no lower than 401 degrees F. Some fluids perform in a range from 460-500-degrees boiling point. For each percent of moisture absorbed, the fluid's boiling point drops 50 degrees. That means brake fluid heavily occupied by moisture will boil when you brake hard, creating air pockets and a spongy pedal, commonly known as vapor lock.
DOT 4 brake fluid, which can be mixed with DOT 3, raises the brake fluid's minimum boiling point to 446 degrees F. It adds borate esters to the DOT 3 glycol fluid to improve fluid properties and raise the boiling point. DOT 4 is more of a late-model automobile brake fluid, but you can use it in classics as well. You can mix it with existing DOT 3 fluid, or you can use it after a major brake overhaul. We suggest completely flushing and bleeding your system with DOT 4 if you're going to change over. Although DOT 3 and DOT 4 are compatible, it makes more sense to have one type in the system.
So what are the advantages of DOT 3 and DOT 4 brake fluids? These fluids offer better braking quality than DOT 5 silicone. Properly bled and serviced, DOT 3 and DOT 4 feel better when you apply the brakes. The downside to mineral-based fluids is the moisture they absorb, not to mention the damage they can do to paint if you happen to spill any.
DOT 5 silicone brake fluid can't be mixed with DOT 3 and DOT 4 fluids. You have to completely flush your system, and ideally, begin with fresh hydraulic components. We suggest fresh calipers, wheel cylinders, and master cylinder because silicone fluid could shock the rubber seals, which have grown accustomed to glycol-based fluids. DOT 5 silicone brake fluid is popular with racers because it has a very high boiling point of 700 degrees F. It's more stable than glycol-based fluids, and it's non-hygroscopic, which means it doesn't absorb moisture, and it won't damage paint.
The downside to DOT 5 silicone brake fluid is a spongy feel in the brake pedal because the fluid is compressible. It has the tendency to make air bubbles during servicing, which means you have to pour it slowly, and to form sludge when mixed with dirt particles. There's also zero compatibility with antilock braking systems and some boil issues with silicone brake-fluid additives. DOT 5 silicone brake fluid is not compatible with water, which only matters if there's any in the system. Water won't mix with silicone brake fluid, so it will remain separate and boil if fluid temperature hits 212 degrees F.
During normal driving, there's not much need to worry about moisture levels in the fluid. It's when we need our brakes badly that moisture in the system can be a problem.
- - - - - - - - - - - - - - - - - - - - - - - - - - - - - - - - - - - - - - - - - - - - - - - - - - - - - - - - - - - - - - - - - - - - - - - - - - - - - - - - - - - - - - - - - - - - - - -
Engine Oil (zink)
Info, about having zinc is taking out of motor oil. You can put in a ZDDP additive. (See the links below)
http://www.valvoline.com/faqs/motor-oil/racing-oil/iHHHH
- - - - - - - - - - - - - - - - - - - - - - - - - - - - - - - - - - - - - - - - - - - - - - - - - - - - - - - - - - - - - - - - - - - - - - - - - - - - - - - - - - - - - - - - - - - - - - -
How to look for a vacuum leak
By John Bellah
Insufficient intake manifold vacuum can be deadly to an internal-combustion engine. As a refresher, the intake stroke of an internal-combustion engine draws in a mixture of fuel and air from the carburetor at about a 13:1 ratio of air to gasoline. This creates a vacuum between the carburetor butterfly (or butterflies on a multi-throat carburetor) and the piston tops. Insufficient vacuum will reduce engine efficiency, causing a loss of power and fuel economy and rough operation, especially at idle. Prolonged vacuum leaks can eventually cause serious engine damage. There are many places vacuum can be lost, but with a few simple tools and diligent detective work, vacuum leaks can be cured for a sweet-running engine.
Leak check prep
Begin with a vacuum gauge and the vehicle’s shop or repair manual. The shop manual should specify how much manifold vacuum is specified for the vehicle’s engine. Also have access to simple hand tools in case the carburetor or manifold must be tightened. Also have access to standard or Vice Grip-brand pliers in case a hose must be temporarily blocked. A can of carburetor cleaner, an 18-inch length of 1/2-inch fuel hose and a couple of shop rags will also come in handy.
Before tackling any type of carburetion problem, the rest of the engine needs to be properly tuned. That means spark plugs and wires need to be checked, the points need to be set and operating properly and the timing — initial lead as well as vacuum and centrifugal advances — need to be properly set. If the engine has mechanical valve lifters (tappets), they must be properly adjusted as tight valves will eventually burn, causing a rough idle and low manifold vacuum. While the spark plugs are removed, a cylinder compression check will determine the condition of the valves and rings. If one has access to an ignition oscilloscope, that diagnostic tool can shortcut some of these operations. In stubborn cases, it may pay to have a knowledgeable technician scope-check the vehicle’s ignition system.
- - - - - - - - - - - - - - - - - - - - - - - - - - - - - - - - - - - - - - - - - - - - - - - - - - - - - - - - - - - - - - - - - - - - - - - - - - - - - - - - - - - - - - - - - - - - - - -
Storage Tips
How to start a stored car (link)
Attending/participating in any Classic Nights Car Club (CNCC) event or show implies express permission to the CNCC to post your image, likeness and/or photograph(s) of your vehicle on our website, and this permission carries over to any media outlet that may be in attendance. Your attendance/participation also releases and discharges the CNCC and/or anyone else connected with the representation of the CNCC from any or all known or unknown damages, injuries, losses, judgments and/or claims that may be suffered by an entrant to his or her person or property. Participants and/or Attendees assume full responsibility for themselves and their vehicles.